Time to bring our baby into the cold, cruel world.
In Part 1 of this tutorial, we learned how to set up a simple React frontend and Express backend. Now, in Part 2, we’ll learn how to host it. There are many, many ways to do this, but for today I’m going to be using DigitalOcean.
DigitalOcean has a ton of extremely good tutorials, and I’m going to be using this one as the backbone for this tutorial. It’s good but only covers the backend, and there are a few changes that we’ll need to make in order for both the front and back ends to be called from the same resource.
Step 1: Getting Your Application on GitHub
In order to transfer the application to your droplet, we’re going to use Git, specifically GitHub. If you’ve never used GitHub before, you can sign up here. This isn’t a Git tutorial, but if you’ve never used the program before, you can check out some handy instructional material here. For now, we’re going to assume you have a GitHub account, and take it from there.
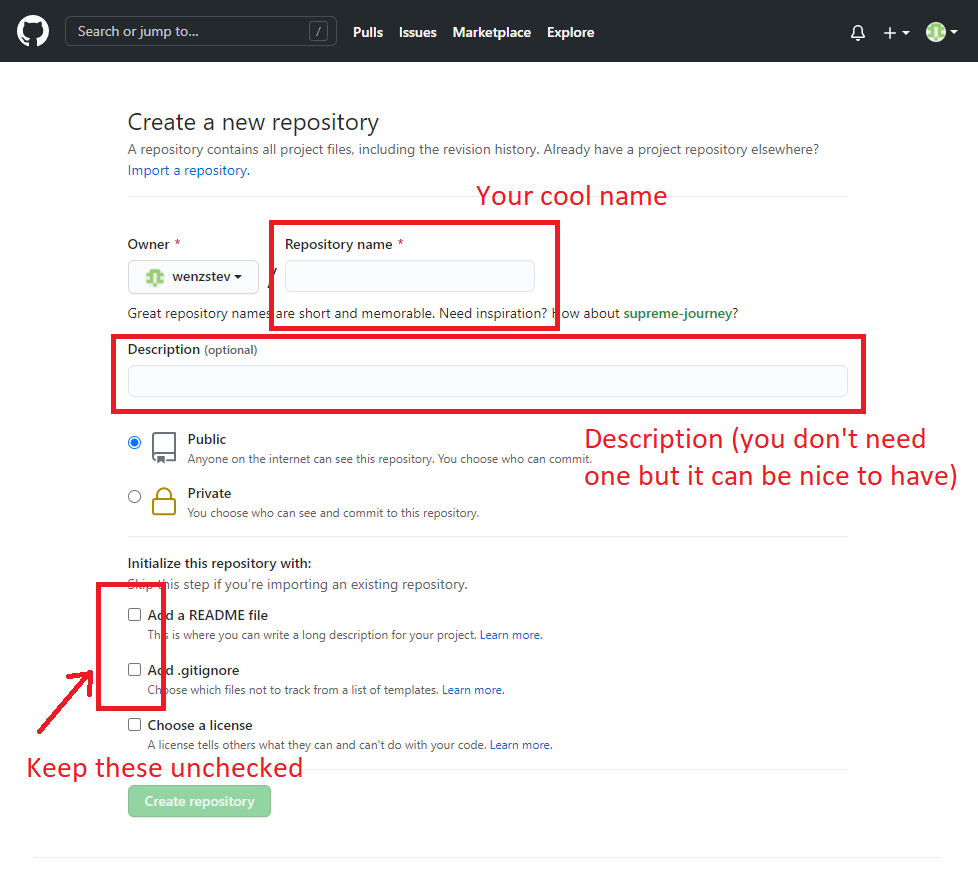
Log in to your account and select the “New” button by the Repositories list, on the upper left side of the screen.

On the next page, name your new repo whatever you like, and provide a description if you want. Make sure that you do NOT provide a README or .gitignore. We’re going to take care of them ourselves.

Click “Create repository” and you should now be on the main page for your brand new repo!
We’re going to be following the instructions there, but first you need to make a few changes to our actual project. The create-react-app function creates it’s own git repository, and we’re going to need to get rid of it in order to make sure everything goes smoothly.
In your file explorer, navigate to the “client” folder that was created when you ran create-react-app. Depending on your settings, you should either see a .git file or not. If you don’t, you’ll need to show hidden files. Here’s how to do it on Windows
When you’ve found the .git file, just delete it. That’s all you need to do to get rid of the repo there.
You should also see a “.gitignore” file. Rather than delete it, we’re going to move it up a folder and modify it to be our own gitignore.
Move the file up into your main project folder, and alter it so that it reads as follows:
# See https://help.github.com/articles/ignoring-files/ for more about ignoring files.

# dependencies
client/node_modules/
backend/node_modules/
/.pnp
.pnp.js

# testing
/coverage

# production
client/build

# misc
.DS_Store
.env.local
.env.development.local
.env.test.local
.env.production.local

npm-debug.log*
yarn-debug.log*
yarn-error.log*
The main change we made here is to change the default /node_modules/ path to work for both the client and the backend folders. Otherwise, we’d be committing all of our Node packages to the git repository, which would be a huge waste of space.
When you’re finished, it’s time to create the actual repo that we’re going to be using. In your terminal screen, navigate to the main project folder and initialize a new git repository with this command:
git initThis will create the new repository, and the .gitignore file you modifed will automatically be used for the repository.
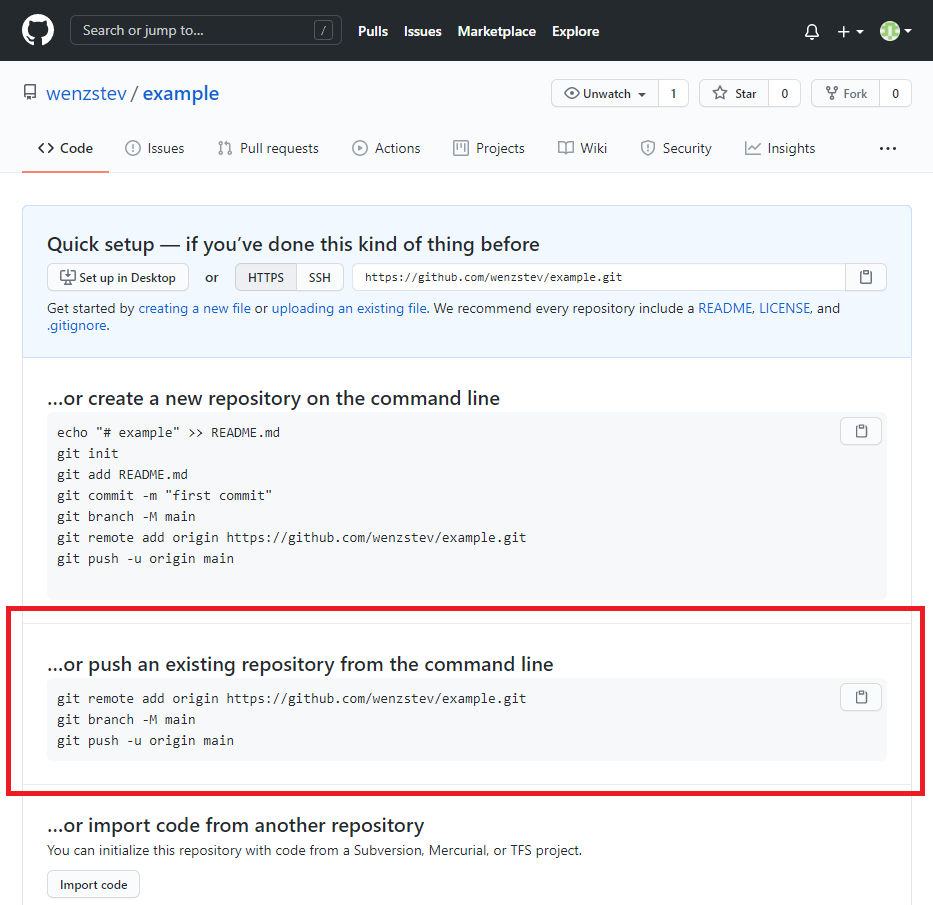
Now we’ve created our repo, but we still need to get it on the internet. To do this, return to the main page of the repo you just created. There will be several options for how to populate this repo, and we’re going to use the second one on the list (“push an existing repository from the command line”).

The commands you see here are to be done in your main git folder. You should still have it open in your console screen, so enter the commands as you see them in the example above (or in your own repository instructions):
git remote add origin https://github.com/[your-username]/[repo-name].git
git branch -M main
git push -u origin main
In the example above, the bracketed information should be replaced with your particular username and repo name. Using the git branch command creates a new branch in the repository, and git push -u origin main pushes the information in the repository to your new branch.
If everything was done right, you should be able to refresh the page and see your repository information online.
Congragulations! Your app is now hosted on Github, and can be cloned to any machine, phyiscal or otherwise. Now, we need to get it on your droplet.
Step 2: Upload your application onto your droplet
For this step, you will need a DigitalOcean droplet running Ubuntu and a domain name that you control. Getting both is outside the scope of this tutorial, but you can use this tutorial as a guide for how to set it up. When you’ve finished doing so, come back here and pick up where you left off.
…finished? Excellent. Now that you’ve got your droplet, let’s get your repo on it.
First, make sure that git is installed on your machine.
sudo apt-get update
sudo apt-get install git
Then, navigate to the folder that you want your repo to be installed on. I generally use my home folder. From there, you need to clone your repository into the folder. You can do this using the command
git clone https://github.com/[your-username]/[repo-name].gitThis will download the contents of the above repository into a new folder in your chosen directory. Congradulations! Your application is now uploaded into your droplet. Now it’s time to deploy it.
Step 3: Deploy your Application
This is actually two distinct steps: deploying the backend and deploying the frontend. Since they are split, we’ll have to do them separately, but don’t worry, the process isn’t complicated.
First, however, we’ll need to install Node.js onto the droplet. In order to do so, we must first install the NodeSource package archives. Navigate to your home directory and install the latest version of NodeSource with the following command:
curl -sL https://deb.nodesource.com/setup_6.x -o nodesource_setup.shThen, run the script with
sudo bash nodesource_setup.shThis will automatically add the NodeSource PPA to your configuration. You can now install Node.js using your packet manager:
sudo apt-get install nodejsYou’ll also want to install the build-essential package in order to allow many of the most important npm packages to work.
sudo apt-get install build-essentialNode.js has been officially installed, and it’s time to deploy our site!
Start up the Backend
Let’s start with the backend. We’re going to be using PM2, a program that manages Node processes in the background. First, navigate to the backend folder in your console and install pm2 using the following command:
npm install pm2 -gThis is similar to other node commands you’ve run, except the -g command installs the package globally, rather than locally to the “backend” package.
After pm2 is finished downloading, you’ll also want to install the rest of the dependencies. These are specified in your package.json and can be easily installed with the command:
npm installNext, you’ll want to start your application using a pm2 command. The following command will start a new pm2 application running your server (assuming your server is named “server.js”):
pm2 start server.jsThis will spawn a new pm2 application and add it to pm2’s process list. Next, you’ll want to ensure that the pm2 process will restart if the system restarts. Use the startup command to generate and configure a script to launch pm2 and it’s processes.
pm2 startup systemdThis will generate a command that you must run. Copy the command and run it exactly as specified, and pm2 will be configured to start on boot.
And that’s it for your backend (for now). We’ll circle back around here when it’s time to bring the project together, but for now let’s look at the frontend.
Deploying the Frontend
React applications created using create-react-app and run with npm start are not optimized for deployment. Fortunatly, the creators of create-react-app have made this process easy. First you have to install all Node dependencies in the frontend, same as you did with the backend. Navigate to the frontend folder and run
npm installThis will install the dependencies. Then, you can run
npm run buildto create a production-ready build of the client.
When the process is finished, you will see a new folder in the directory called build. This is the folder that that has the version of the client we actually want to run.
Tying it together with Nginx
But in order to deploy it, we’ll need a server. For this tutorial, I’m going to use NGINX, which is popular for DigitalOcean tutorials. You should use this tutorial to install and set up Nginx on your droplet.
Once you have Nginx installed, navigate to your /etc/nginx/sites-available folder. This stores all the sites that Nginx serves. We’re going to create a new file to serve our application.
sudo nano application.nginx This will open up the new file. Enter the following configuration:
server {
    server_name [yoursitename] www.[yoursitename];
    root /home/[yourname]/client/build;
    index index.html index.htm;

    location / {
        try_files $uri /index.html;
    }

    location /api {
        include proxy_params;
        proxy_pass http://localhost:5002;
    }
}
Replace the bracked information with your personal info.
Let’s break down what this configuration files does. The server_name key establishes the name of the server that the file will be searching for. The root key tells Nginx where to look for the entrance into the application. In this case, it’s the build folder that we created earlier. Specifically, it looks for the index.html file, as referenced on the next line.
The two location keys establish the link between the front and backends. For routes beginning with “/”, Nginx directs the request to our frontend. For routes beginning with “/api”, Nginx will direct the request to our backend by using the proxy_pass command to pass the request along to localhost:5002, which is where we have the server listening.
And that’s all the setup you need. Initialize the new server by creating a link between the sites-available and sites-enabled folders.
sudo ln /etc/nginx/sites-available/application.nginx /etc/nginx/sites-enabledThen, test your server to make sure everything is running properly.
sudo nginx -tFinally, restart the Nginx application for your changes to take effect.
sudo systemctl restart nginx If everything worked properly, you should be able to navigate to your domain name and see our project! Congratulations, your ERN stack application is officially hosted!