Now that authorization was out of the way, it was time to begin really linking up the frontend and backend. While there is still plenty to design in front, I wanted to add some kind of communication, both as a proof of concept that my authorization was working and because I really wanted to see this thing work. But before I could do that, I had to make one final adjustment to the authorization: Redux.
Adding Redux
In trying to implement the use of my authorization token for fetch requests, I quickly realized that passing state down through 10 layers of components would get old fast. So I decided to do a quick refactor of my code, and bring in Redux to handle the token and the user information.
So far, my implementation is dead simple: there are two pieces of the store: token, which stores the authorization token, and user, which stores the username and authorization information of the user.
import {combineReducers} from 'redux'

const tokenReducer = (state=null, action) => {
  switch (action.type) {
    case 'SETTOKEN':
      return action.payload
    default:
      return state
  }
}

const userReducer = (state=null, action) => {
  switch (action.type) {
    case 'SETUSER':
      return action.payload
    default:
      return state
  }
}

const rootReducer = combineReducers({
  token: tokenReducer,
  user: userReducer
})

export default rootReducer
Likewise, I only have two actions: SETTOKEN, which sets the token, and SETUSER, which sets the user.
export const setToken = (token) => {
  return {
    type: 'SETTOKEN',
    payload: token
  }
}

export const setUser = (user) => {
  return {
    type: 'SETUSER',
    payload: JSON.parse(user)
  }
}
Like I said, dead simple. I’m using hooks to access the necessary information in my various components, and everything works quite nicely.
Creating a Generic Modal
In order to add recipes and lists from the main page, I wanted to add a Modal component that would be activated when the option was selected from the menu. In order to avoid repeating myself too much, I created a single blank modal template and then added the necessary components on top of it. I placed this template in my SearchBar component, and stored the specific modal component as a piece of state.
// In SearchBar. js

// new styling
...
modal: {
  position: "relative",
  width: "95vw",
  top: "30vh",
  margin: "auto",
  "&:focus": {
    outline: "none"
  },
},
modalPaper: {
  borderRadius: 15,
  padding: "7px 14px",
  backgroundColor: theme.palette.secondary.main
}
...

// new state
...
const [modal, setModal] = useState(null)
const [modalOpen, setModalOpen] = useState(false)
...

// modal component
...
<Modal open={modalOpen} onClose={()=>setModalOpen(false)}>
  <Box className={classes.modal}>
    <Paper className={classes.modalPaper}>
      {modal}
    </Paper>
  </Box>
</Modal>
...
This method ensures that as little code as possible is repeated in the modal components themselves, and it creates a nice, basic look for the modal that is in line with the rest of the styling.
Adding New Recipes
Now that I had the modal component ready, it was time to actually add some use. I started with the AddRecipeModal component. This component reuses some of my components from the sign-in page (and, consequently, will look better when I return to give those components a makeover). Fundamentally, all it does is take a URL and submit it to the backend for parsing. At the moment, there is no recipe page (and thus no way to edit what the parser returns), but the backend can still produce its best guess no problem.
This component also gave me the opportunity to test my implementation of Redux and my token-based authorization for the first time, and I’m pleased to note that everything went well.
const AddRecipeModal = () => {
  const token = useSelector(store=>store.token)
  return (
        <Formik
          initialValues =
          onSubmit={(values, actions)=>{
            const headers = new Headers()
            headers.append('Authorization', 'Basic ' + btoa(token + ":"))
            headers.append('Content-Type', 'application/json')
            const body = JSON.stringify({"create_from_url":values.url})
            console.log(body)
            fetch("/recipes",{
              method: "POST",
              headers: headers,
              body: body
            })
            .then(response=>{
              if(response.status===200){
                return response.json()
              } else {
                throw new Error("Something went wrong!")
              }
            })
            .then(json=>{
              console.log(json)
            })
            .catch(err=>console.log(err))
          }}>
          <Form>
            <FormikTextField label="URL" name="url"/>
            <ButtonTemplate type="submit" color="primary">Get Recipe</ButtonTemplate>
          </Form>
        </Formik>
  )
}
The actual posting process is still a fair amount of boilerplate, and at some point I’d like to look at a library like Axios to help with that. But for now, it’s working.

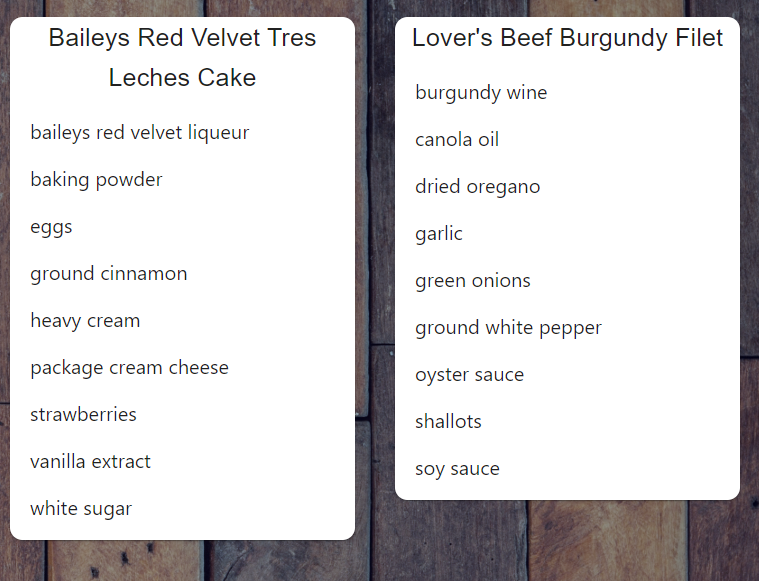
Remember these? They were two of the recipes that I used for testing during my last attempt at building this app. Here they are now, looking much better and ready to be added to any list necessary. The recipe arc comes full circle.
As you can see, there are still some issues with the parsing, but those will be ironed out when I create the actual recipe page. I think that’s next.
Adding Lists
I also created a modal and a fetch request to add grocery lists, but due to the nature of how the backend is set up, all that it really does right now is create a new, blank list. So it’s more for proof of concept than anything else.
const AddListModal = () => {
  const token = useSelector(store=>store.token)
  return (
    <Formik
      initialValues=
      onSubmit={(values, actions)=>{
        const headers = new Headers()
        headers.append("Authorization", "Basic " + btoa(token + ":"))
        headers.append("Content-Type", "application/json")
        const body = JSON.stringify(values)
        fetch("/lists",{
          method: "POST",
          headers: headers,
          body: body
        })
        .then(response=>{
          if(response.status===201){
            return response.json()
          } else {
            throw new Error("Something went wrong!")
          }
        })
        .then(json=>console.log(json))
        .catch(err=>console.log(err))
      }}>
      <Form>
        <FormikTextField label="List Name" name="name" />
        <ButtonTemplate type="submit" color="primary">Create List</ButtonTemplate>
      </Form>
    </Formik>
  )
}
There are still some areas that I need to flesh out with these actions. Notably, there is poor error handling and no way for the user to know if their action was successful or not. So expect to see me return to these areas in the near future.
Next Steps
- create the recipe page
- add the ability to put recipes in lists
- add the settings page