In order for this app to have any function at all, people are going to need to log in to it. With that in mind, I decided that the next page I would implement would be the login page.
Enter Formik
Forms, at the best of times, can be complicated, and I wanted to make mine as simple as possible. Back when I was first learning React, the course that I was using recommended Formik for all of my form needs, and I decided it was time to test it out.
Folks, it’s great. Once I got over the (pretty small) learning curve, it was a cinch to implement Formik’s solution to forms in a simple, reusable way. I followed the documentation’s recommendation and first created a reusable component that implemented Formik with the particular styles I wanted (in this case, Material-UI’s TextField component).
const useStyles = makeStyles({
  root: {
  "& fieldset": {
    borderRadius: 15,
  },
  "& input": {
    backgroundColor: "#B3B3B3",
    borderRadius: 15,
  },
  "& label": {
    backgroundColor: "#B3B3B3",
    padding: "0px 5px",
    borderRadius: "10px",
    }
  }
})

export const FormikTextField = ({label, ...props}) => {
  const [field, meta] = useField(props)
  const classes = useStyles()
  return(
    <Box my={2}>
      <TextField
        className={classes.root}
        label={label}
        variant="outlined"
        fullWidth
        {...field}
        {...props}
        {...meta.touched && meta.error ?
          ({error: true, helperText: meta.error})
          : null}
      />
    </Box>
  )
}
This again makes use of the makeStyles hook to inject custom styling into my component, as well as the useField hook from Formik to hook up my custom inputs with Formik’s goodies.
From there, I was able to create two separate forms: one for registering a new account, and one for loggin in. I’ll include only the login form here, because they’re essentially identical. First, we have the <Formik> component, which sets up our initial values and validation requirements (making use of Yup as recommended by Formik documentation).
<Formik
  initialValues =
  validationSchema = {Yup.object({
    email: Yup.string()
      .email("Invalid email address")
      .required("Required"),
    password: Yup.string()
      .required("Required")
  })}
Then, we have the onSubmit function, which in this case sends a GET request to my locally hosted server, and requests a token (see my previous post) from the server. This token will then be used to make additional requests as necessary.
onSubmit={(values, actions) => {
          let url = "http://localhost:5000/users/token"
          let username = values.email
          let password = values.password

          let headers = new Headers()

          headers.append('Authorization', 'Basic ' + btoa(username + ":" + password))

          fetch (url, {method:'GET', headers: headers,})
            .then(response => response.json())
            .then(json => console.log(json))

        }}
Finally, I returned the actual layout of the form, which makes use of my FormikTextField component, and some other Material-UI components to make it look nice and purty:
<Form>
  <Paper className={classes.root}>
    <Box p={2}>
    <FormikTextField label="Email" name="email" type="text" />
    <FormikTextField label="Password" name="password" type="password" />
    </Box>
  </Paper>
  <Box m={2}>
    <ButtonTemplate type="submit" color="secondary">Log In</ButtonTemplate>
  </Box>
</Form>
</Formik>
I added in some custom styles, and this was the result:
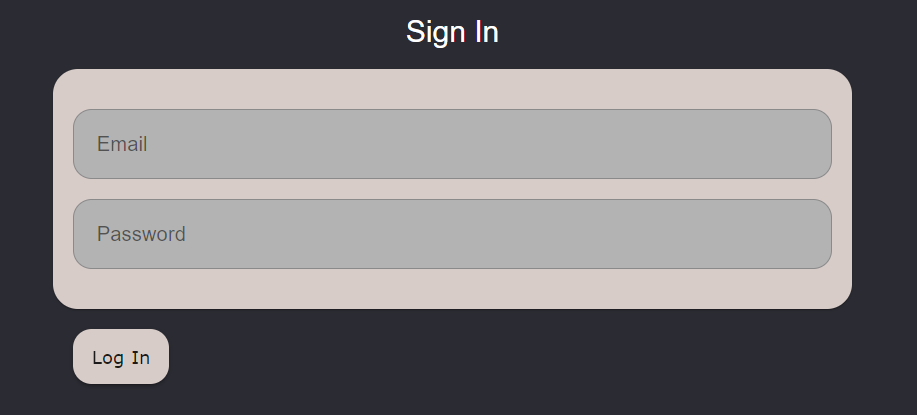
Unfortunately, Material-UI isn’t exactly what I’m going for with this implementation, and I’m going to need to think about where I go from there. In particular, the way that the form label minimizes itself and moves to the top left of the input field does not work well when the color of the input field differs from the color of the background, as it does here. But that’s a relatively minor complaint, and I’m trying to focus instead on getting everything functional.
I created the RegisterPanel in a similar fashion and arranged them together on a single page using the Grid component:
return (
  <div className={classes.root}>
    <LoginSquiggle />
    <Container className={classes.panel}>
      <Grid container>
      <Grid item xs={12} md={6}>
        <Box mx={5}>
          <LoginPanel />
        </Box>
      </Grid>
        <Grid item xs={12} md={6}>
          <Box mx={5}>
            <RegisterPanel />
          </Box>
        </Grid>
      </Grid>
    </Container>
  </div>
)
To be honest, though, I might just split these two panels into separate pages. It feels cleaner that way, and I don’t really want returning users to be faced with the option to register an account every time. But I’m going to save that for another time.
Of course, this page isn’t really done yet, because I still need to implement the calls to the backend to log in and register new accounts. That also comes with the added need to set up a way to verify an account through the frontend of the app. I’ve begun to work on those things, but I felt that I needed to get out a blog post, since it’s been over a week since I last posted. Additionally, learning Formik and figuring out the verification process took longer than I expected it to, and I think I’m going to switch gears here for a bit and focus on other parts of the app. My hope is to get all of the base pages in and then focus on linking them all up.
Next Steps
- implement the home page
- implement the list modification page
- begin hooking all the separate pages up