When last we left the writing sprinter, I had completed the basic look of the site and worked through most of the structural layout. Now, it was time to get to work making it actually function.
I decided to implement features in the same basic order that a user would run the app. I don’t really have a reason for that other than it made sense at the time and that’s just how my brain works with these things. Accordingly, I decided to start with the settings modal, which meant the return of global variables and, in my case, Redux.
Implementing Redux
I decided to have global state for only a few variables, namely those that had far-reaching consequences for the rest of the app. Looking through my structure, I decided that there were only four variables that qualified:
- the sprint timer,
- a variable to determine if the sprint has started,
- two variables to indicate if the sprint is using a visual or verbal prompt.
With these in mind, I created my reducers.
import {combineReducers} from "redux"

const timeReducer = (state=10000, action) => {
  switch(action.type){
    case "SETTIME":
      return action.payload
    case "RESET":
      return 10000
    default:
      return state
  }
}

const startReducer = (state=false, action) => {
  switch(action.type){
    case "STARTTIMER":
      return true
    case "RESET":
      return false
    default:
      return state
  }
}

const hasImagePromptReducer = (state=true, action) => {
  switch(action.type){
    case "IMAGE":
      return !state
    default:
      return state
  }
}

const hasTextPromptReducer = (state=true, action) => {
  switch(action.type){
    case "TEXT":
      return !state
    default:
      return state
  }
}

const rootReducer = combineReducers({
  time: timeReducer,
  start: startReducer,
  hasImage: hasImagePromptReducer,
  hasText: hasTextPromptReducer,
})

export default rootReducer
My basic reducer structure here is similar to my calculator app, although here I decided to include all the reducers in a single file. I did this because Redux takes up a comparatively smaller part of my app this time around, and I didn’t want to get too cluttered with small files.
But redux doesn’t work if it’s disconnected from the actual app, so for my next step, I hooked up the settings on the start modal to these values. This was mainly done through hooks. In my TimePicker component, I called the useDispatch and useSelector hooks to access my redux variables.
const TimePicker = (props) => {
  const dispatch = useDispatch()
  const time = useSelector(state=>state.time)
  const hasTextPrompt = useSelector(state=>state.hasText)
  const hasImagePrompt = useSelector(state=>state.hasImage)
Because the buttons were very simple, I used anonymous functions to call dispatches to their corresponding redux values, like so:
<RadioGroup
    row
    value={time}
    onChange={(event)=>dispatch(setTime(parseInt(event.target.value)))}>
      <FormControlLabel
        value={5000}
        control={<Radio />}
        label="5 minutes"
        labelPlacement="bottom"/>
      // other radio buttons here
I also rigged the “Get Started!” button up to start the counter, and used the same variable to determine if the modal would be open in the main app. This ensured that the modal would be removed when the timer began.
function App() {
  const modalIsOpen = useSelector(state=>state.start)

  return (
    <div>
      <SprintPad />
      <SettingsModal open={!modalIsOpen}/>
    </div>

  );
}
Now that the modal could control the time and settings of the sprint, it was time to begin implementing the app’s main function.
The Timer
I included the logic of the countdown timer in the TimerBar component, again hooking into my Redux context to get the actual time. Additionally, I included three more pieces of state in the component itself:
- the
DateTimestamp of when the timer started, - the initial value of the timer (as the redux value would be counting down),
- and the actual counter, initialized as a
setIntervalfunction. I saved this in state so that I could use theclearIntervalfunction to clean up the timer when it was finished counting down.
Taken together, the state and the redux look like this:
const dispatch = useDispatch()
const time = useSelector(state=>state.time)
const start = useSelector(state=>state.start)
const [startStamp, setStartStamp] = useState(0)
const [counter, setCounter] = useState()
const [initialTimerAmount, setInitialTimerAmount] = useState()
In order to actually implement the countdown timer, I used the useEffect hook. This tripped me up for a little while because I didn’t fully understand javascript closures and the fact that changing state with the useState hook doesn’t actually change it until the next render. I spent a lot of time scratching my head and trying to figure out why my state wasn’t changing.
Ultimately, my solution involved three different uses of useEffect, each one watching for a different change of variable.
useEffect(()=>{
  if (start){
    setStartStamp(()=>new Date().getTime())
    setInitialTimerAmount(time)
  }
}, [start])

useEffect(()=>{
  if (startStamp != 0){
    setCounter(setInterval(()=>{
      const current = new Date().getTime()
      dispatch(setTime(time-(current-startStamp)))
    }, 1000))
  }
}, [startStamp])

useEffect(()=>{
  if (time < 0) {
    clearInterval(counter)
  }
}, [time])
The first call to useEffect watches the start variable, which is part of redux. When start changes (which it only does once, at the beginning of the sprint), useEffect sets the startStamp variable to the time when it was activated.
The second useEffect call watches the startStamp variable change, meaning it is triggered after the first call. This call actually sets up the interval timer, which ticks every second and provides a dispatch call to change the timer by the time between the two calls. I used Date objects to ensure that the timer was as accurate as possible.
The third useEffect call watches the time variable, but does nothing until the timer has counted down to zero. Then, it calls clearInterval on the interval, cleaning it up and ensuring that the timer does not continue to count down after 0. Taken together, these three variables take care of all the timer needs for the app.
Writing in the Sprint
With the timer complete, it was time to actually enable the user to write their sprint. Because I wanted to have a single place that knew about the present paragraph being written and the past paragraphs that were written, I created a new component, WritingController, that held all of the information regarding the writing process. This controller uses two key pieces of state: completedParagraphs for what has been written so far, and currentParagraph for the paragraph the user is currently writing. currentParagraph also serves as the value for the controlled TextArea in the WritingPanel component.
const [completedParagraphs, setCompletedParagraphs] = useState([])
const [currentParagraph, setCurrentParagraph] = useState("")

...

<WritingPanel
      currentParagraph={currentParagraph}
      handleChange={(e)=>setCurrentParagraph(e.target.value)}
      handleKeyPress = {handleKeyPress}
      />

// in the WritingPanel component
<TextField
  fullWidth
  multiline
  placeholder="Get inspired!"
  value={props.currentParagraph}
  onChange={props.handleChange}
  onKeyPress={props.handleKeyPress}
/>
I then wrote an onKeyPress function that would check if the user pressed “Enter” (to indicate a new paragraph). If so, then the contents of currentParagraph would be transferred to the next element in the array of completedParagraphs, and currentParagraph would be reset.
const handleKeyPress = (e) => {
  if (e.key == "Enter"){
    setCompletedParagraphs(state=>[...state, currentParagraph])
    setCurrentParagraph("")
  }
}
In the CompletedSection component, I wrote a function that maps the paragraphs into CompletedParagraph components, and renders them on the page.
const CompletedSection = (props) => {
  const completedParagraphs = props.paragraphs.map((x, i) => <CompletedParagraph text={x} key={i} />)

  return (
    <Box px={3}>
      {completedParagraphs}
    </Box>
  )
}
Thus, when the user presses enter, the paragraph they were working on is transferred to the completed section, and they can begin a new paragraph.
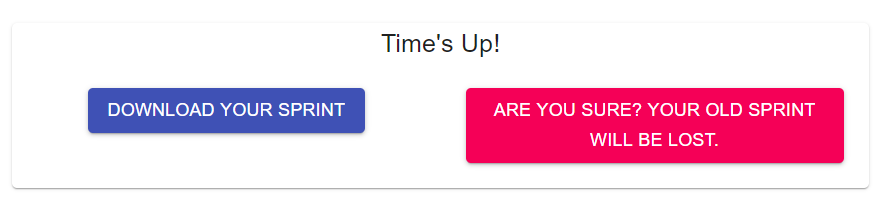
The TimesUp Component
The whole point of a writing sprint is to prevent the writer from writing after the time is up, and so I needed to lock down the app when the timer expired. To do so, I created a new component, called TimesUpPanel, that would replace the WritingPanel at the end of the timer. This new component has two buttons: one to download the sprint, and one to reset the app to sprint again.

By creating a conditional render of either the WritingPanel or the TimesUpPanel, I was able to have the WritingController component determine which one was necessary.
const inputPanel = (time > 0 ?
  <WritingPanel
    currentParagraph={currentParagraph}
    handleChange={(e)=>setCurrentParagraph(e.target.value)}
    handleKeyPress = {handleKeyPress}
    /> :
    <TimesUpPanel
      downloadSprint={downloadSprint}
      resetClick={resetClick}
      confirmClick={confirmClick}/>
  )
Here, time is again the global Redux timer variable.
I then needed to write the actual functions that would execute when these buttons were pressed. To download the sprint, I created a new <a> element and set it to download when clicked. Then I simulated a click with the element.click() function.
const downloadSprint = () => {
  const element = document.createElement("a")
  const file = new Blob([completedParagraphs.join(" ")], {type: 'text/plain'})
  element.href = URL.createObjectURL(file)
  element.download="sprint.txt"
  document.body.appendChild(element)
  element.click()
  setHasDownloaded(true)
}
I also implemented a piece of state to tell if the file had been downloaded. I did this because resetting the sprint would cause the old sprint to be deleted, and I wanted to ask for confirmation before doing so. In the same vein, I implemented a piece of state to act as a “confirmation click.” Clicking on the reset button would first trigger the confirmation click to true, and a second click would actually reset the app.
const resetClick = () => {
  if (hasDownloaded || confirmClick){
    resetWritingPanel()
  } else if (!confirmClick){
    setConfirmClick(true)
  }
}

const resetWritingPanel = () =>{
  dispatch(reset())
  setCompletedParagraphs([])
  setConfirmClick(false)
  setHasDownloaded(false)
}
I also created a separate button for confirming the reset. When clicked on, the reset button would change to the confirm reset button, and a second click would actually initiate the reset.
Implementing a floating panel
There was one final quality-of-life feature that I wanted to add. Although the WritingPanel looked good at first, any sprint of any real length would cause the page to run past the screen, creating a scroll bar. And when that happened, the prompt would quickly fall out of screen. In order to fix this, I wanted to make the prompt float using a position: fixed command, so that it functioned more like a navbar than a static element on the screen. I used the makeStyles() hook provided by Material-UI to alter the style of the PromptWindow:
onst useStyles = makeStyles({
  headerBox: {
    position: "fixed",
    width: "100%",
    top: 32,
    left: 0
  },
  headerPaper: {
    width: "90%",
    margin: "auto"
  }
})

const PromptWindow = () => {
  const classes = useStyles()

  const headerHeight = 250

  return (
      <Box p={2} height={headerHeight}>
        <Box className={classes.headerBox}>
          <Paper className={classes.headerPaper}>
            <Grid container>
              // Text and Image prompts go here
This ensured that the image and text prompts would remain in the user’s view no matter how long their sprint lasted.
The Future
With most of the actual functionality of the app created, my last step is to create dynamic image and text prompts. The Mona Lisa and my made-up excerpt have served well as placeholders, but it’s time to provide a bit more variety. But that’s for next time.