While I had created a user system in my last post, it was essentially functionless because it wasn’t tied to any actual data in the program. It didn’t do anything, except allow you to log on. It was time to fix that.
First, I returned to my models.py file and added a new relationship to my database, tying the CompiledList model to the User model:
# in CompiledList class
user_id = db.Column(db.ForeignKey('user.id'), nullable=False)  # the id of the user who made the list

# in User class
checklists = db.relationship('CompiledList', backref='user', lazy=True)  # the user's grocery lists
This tied all created CompiledLists to a user, which would enable me to only show a user the list that they had created. I began this process by adjusting my grocery_lists variable that I used to track lists on the navbar, changing it so that, instead of returnign all lists, it only returned the lists created by the currently logged on user. For example, in my main list page:
grocery_lists = CompiledList.query.filter_by(user_id=current_user.id)This now negates the ability of a non-logged in user to access any lists (or create them, since CompiledLists now need a user_id), but I’m going to fix that in a later post, when I add the ability for guests to make temporary lists. In the meantime, it’s time to move on to the main feature of this post: a new user homepage.
Now that the account feature created the possibility of returning users, I didn’t want to make the current home.html their page. Instead, I wanted to redirect the user to their own custom homepage, which would display all of their grocery lists and give them the opportunity to create new ones. First, I created a simple check on my homepage to determine if the user was logged in or not:
def home():
    if current_user.is_authenticated:
        return redirect(url_for('account.user_homepage'))
Then, I created my new user_homepage route in my accounts.py file.
@account.route('/home', methods=['GET', 'POST'])
def user_homepage():
    user_lists = CompiledList.query.filter_by(user_id=current_user.id)
    user_lists = [ChecklistCard(c, 3) for c in user_lists]

    return render_template('user_home.html', user_lists=user_lists, url_form=url_form, grocery_lists=user_lists)
You can see here a new class, the ChecklistCard class, which I created to simplify the process of showing the user’s recipes. On the recipe homepage, I want to display a series of cards with the title of the grocery list and the first three recipes the list contains. The ChecklistCard class groups all of this information together to make templating simpler:
class ChecklistCard:
    def __init__(self, checklist, num_samples):
        self.name = checklist.name
        self.hex_name = checklist.hex_name
        self.lines = CleanedLine.query.filter_by(list=checklist).all()
        self.recipes = RecipeList.query.filter(RecipeList.complist == checklist,
                                                  RecipeList.name != "Additional Ingredients").all()

        self.sample_lines = self.lines[:num_samples]
        self.sample_recipes = self.recipes[:num_samples]

        self.leftover_recipes = len(self.recipes) - len(self.sample_recipes)
This creates several variables that will make templating easier, including a sample_recipes class that holds the first three and a count of the leftover_recipes to give the user an idea of how many additional recipes the list is holding.
Now, it’s time to template:
{% extends 'layout.html' %}

{% block content %}
<h1>Your Lists</h1>

{% for list in user_lists %}
  <div class="card recipe-card">
      <div class="card-body">
          <h5><a href="{{url_for('checklist.compiled_list', hex_name=list.hex_name)}}" class="stretched-link card-title"></a></h5>
          {% for recipe in list.sample_recipes %}
              <h6 class="card-subtitle mb-2 text-muted">{{ recipe.name }}</h6>
          {% endfor %}
          {% if list.leftover_recipes > 0 %}
              <p class="card-text font-italic text-muted">...and {{list.leftover_recipes}} more. </p>
          {% endif %}
      </div>
  </div>
{% else %}
  <h3>You haven't made any lists yet.</h3>
{% endfor %}
{% endblock content %}
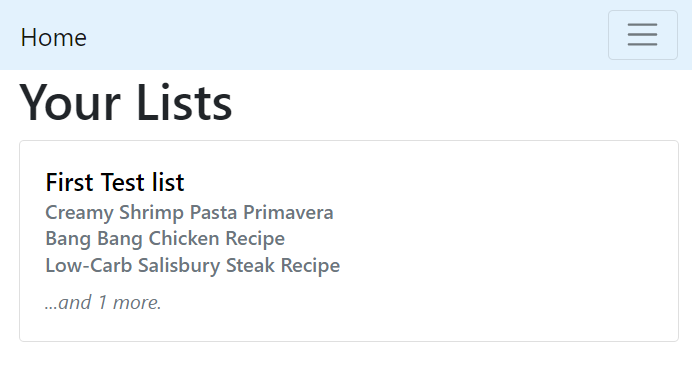
Here’s a screenshot of the new user page:

Astute readers will notice some fairly significant changes, both in style and in the classes I’m using for my html. This is because I made the switch to Bootstrap 4, a more complicated change than I thought it would be but ultimately much better. To be honest, I’m not sure why I haven’t been using it from the beginning. I think that I was just unfamiliar with Bootstrap and continued to use the version that I’d learned in the Flask Tutorials.
Up until now it hasn’t been an issue, but in trying to implement cards for my list, I realized that they weren’t functioning in Bootstrap 3 and I would need to change. To be honest, I like this version more; it’s better designed and I feel that I am using less CSS, but it was still a bit annoying and going through my code to make sure that everything functioned again and didn’t look (too) terrible is what took up a lot of my time today and yesterday. For example, the change broke my hover code on the list page, and I had to figure out that the .hidden class no longer functioned, and substitute out the new d-none class. Little things like that that sort of broke stuff, just a bunch of clutter. I’m trying to keep to a better update schedule for this blog so I’m going to go ahead and publish this, but be on the lookout for part 2 tomorrow or the next day, in which I add in some extra functionality to the list page and make sure it’s all running smoothly.